Title: Self Portrait
Medium: Acrylic on canvas Size: 3x3ft PROCESS PLANNING/RESEARCHING It was difficult deciding what I wanted to do for my self portrait because I could really do almost anything I wanted. There are so many options! There are tons and tons of different artists, art movements, art styles i could base my portrait off of. My first step was to look back through the process journal from sophomore art history. I wasn't really feeling anything so I decided to go onto Mr. Chads weebly and then look through the websites of current seniors and also of students who have already graduated from Reagan. After searching through many websites i was specifically drawn to one art piece done by Sierra Falkowski. |
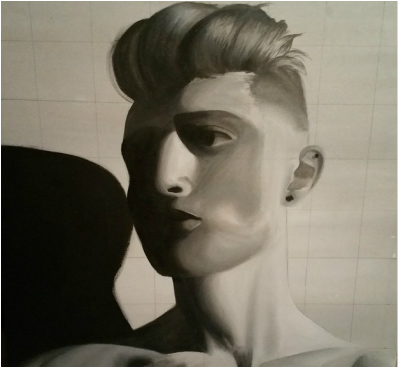
EXHIBITION TEXTWhen creating this portrait the main focus was to clearly communicate it was based off of black and white photography. The black and white and dramatic pose is supposed to clearly show George Hurrell as the inspiration. I created this piece using black and white acrylic paints on a whit canvas.
TAKING THE PHOTO
To take the picture I knew I wanted to pose dramatically and have the light only hit one side of my face and body. The picture was taken in my living room. I sat against one of the walls and had the camera pointing directly at me. For the lighting I removed the lampshade from one of the lamps in my living room and placed to the side of me. Once I had the lamp positioned the way I wanted it I turned off all of the other lights in the house so there wouldn't be any other light interrupting the picture.
|
I knew immediately he was who I was going to base my portrait off of. After finding the inspiration and artist inspiration behind my portrait, I began planning out how i would photograph myself.
GATHERING PICTURES AND SKETCHES
So, the first step to creating a self portrait would be creating something to base the portrait off of, such as a photograph of oneself. After researching different photographs taken by George Hurrell, and seeing many different poses I decided how i would be taking my picture. |

PAINTINGPRE-PAINTING
1.) Painted a base coat. I used a very light gray hue. 2.) Edited picture: filtered it black and white, placed an 8x8 grid on the photo. 3.) Drew out an 8x8 square grid onto the canvas 4.) Sketched out my face onto the canvas using the grid. |

|
When i researched George Hurrell and looked through Google images these three images stood out to me the most. Although one of them was not directly taken by George Hurrell himself, it was based off of the style of George Hurrell. I knew when I would take my picture for my portrait I wanted to pose very dramatically because that was mainly the style of George Hurrells portraits. After looking between these three photos I decided to go with a similar pose as the first photo. I wasn't planning on posing exactly like the woman in the first photo but definitely wanted to pose similarly. |
PAINTING
The first thing i began painting was my collarbone and neck. It was the area with the most defined creases and shadows so i was intrigued to begin with that. After the collarbone and neck I filled the large portions of shadow, which was the right side of my face and the shadow my head was casting in the picture. From there I began with the hair which led me to the eye, mouth and nose. I didn't really paint in any specific order. I went from one area to another to another. My favorite part to paint was the hair because of the fine streaks of the hair and it also was the part that turned out the best. I'm also pleased with the way the neck and collarbone turned out. Of course one of the trickier parts was blending. I dont have much trouble blending but for some areas such as the cheek and jaw was pretty tricky to blend the shadows with the highlights. |
